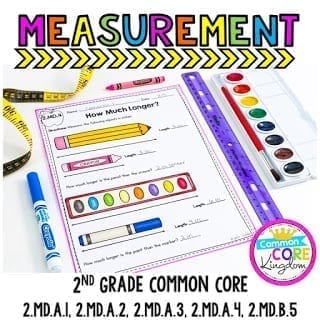
Measurement is a big topic for second grade. There is a lot that goes into teaching the second grade Common Core measurement standards, and tons of engaging and interactive activities you can use. Here are some helpful tips for teaching your 2nd graders.
What First Graders Need to Know
Students should enter the 2nd grade with the following skills:
Order 3 objects by length. (ex. The book is the longest, the paper is the second longest, and the pencil is the shortest.)
Compare the lengths of two objects by using a third object. (The eraser is longer than the paperclip. I know this because I am using my pencil as a measurement tool.)
Determine the length of an object as a whole number of length units, by laying multiple objects of shorter objects end to end.
Understand that to determine the length of an object, same-size units must span it with no gaps or overlaps
Students entering 2nd grade may or may not have a full grasp of these concepts. Students who start out behind may require additional help in small groups, but it’s not necessary to reteach first grade concepts.
Teaching 2nd Grade Common Core Measurement
2nd Grade Common Core measurement standards build on each other, so it helps to teach these standards in order. Here are each of the 2nd grade Common Core Measurement standards along with some teaching tips that help make this topic engaging and effective.
Teaching Second Grade Measurement: 2.MD.A.1
Measure the length of an object by selecting and using appropriate tools such as rulers, yardsticks, meter sticks, and measuring tapes.
Focus on the Following Measurement Tools
Students are more likely to learn measurement concepts when they aren’t overwhelmed by too many tools. It’s important to teach about different tools, but focusing on the tools below will allow students to grasp measurement concepts without being overwhelmed.
Tape Measure:
Flexible- Used to measure clothes and round objects
Retractable- Used to measure longer distances, such as a room
Meter Stick– Used to measure objects longer than a ruler when measuring in meters, centimeters, or millimeters.
Yardstick– Used to measure objects longer than a ruler when measuring in yards, feet, inches
Ruler– Used to measure smaller objects, such as an eraser
Day 1:
Opening: Allow time (10 minutes) for exploration. Make sure to put plenty of tools at each group for students to explore. As they explore the tools, have them note any observations they make in their math journal.
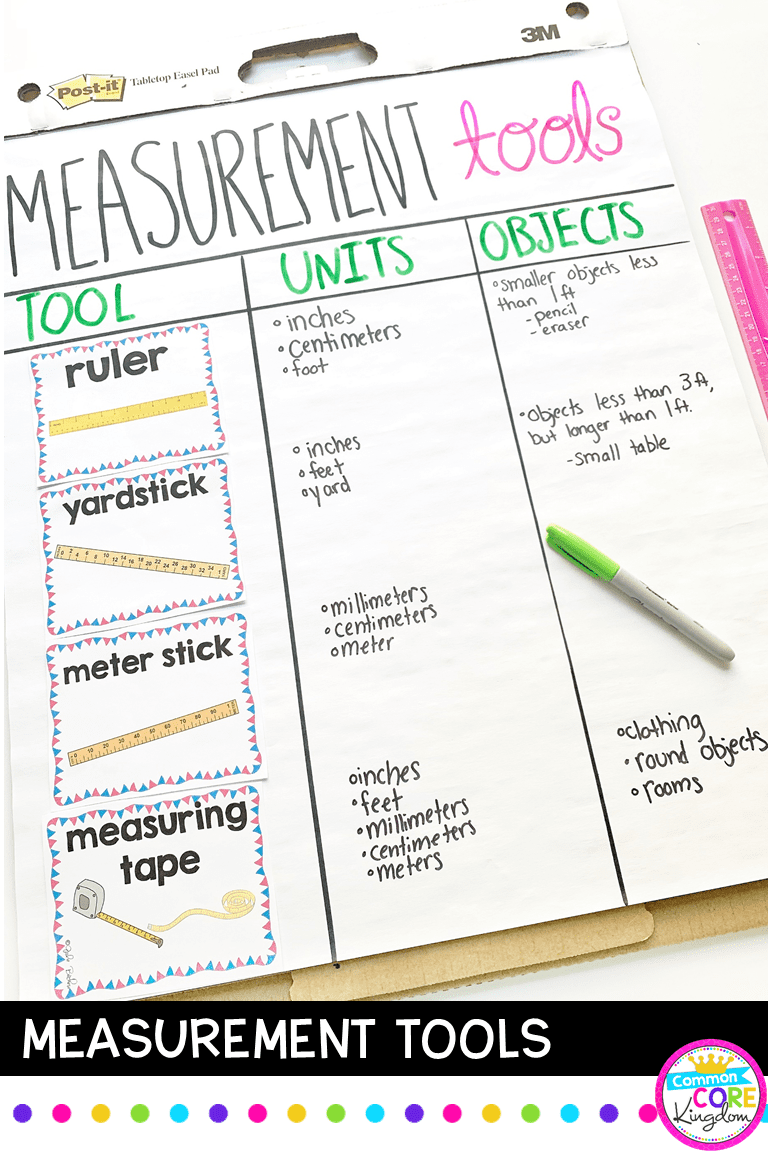
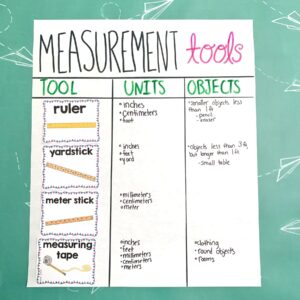
Mini Lesson: Gather students, then introduce the different measurement tools. Make an anchor chart of all of the different tools, the units on each tool, and the types of objects they measure.
2nd Grade measurement tools anchor chart for 2.MD.A.1.
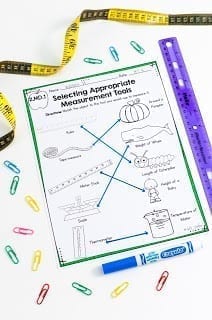
Independent Work: Have students complete practice worksheets that require selecting the appropriate measurement tools. (These can be found in my Measurement Unit here.)
Closing: Review the measurement anchor chart. Ask students to summarize what they learned. Use questions like:
What tool would you use to measure the height of Sam?
What tool would you use to measure the length of the table?
What tool would you use to measure around a ball?
Day 2:
Opening: Review (10 minutes) the anchor chart from the previous day. Discuss the different tools, then ask review questions about which tool would be best to measure specific objects.
What tool would you use to measure the weight of a dog?
What tool would you use to measure the length of a marker?
What tool would you use to measure someone’s waist?
Model: Show students each measurement tool and how to use it.
Make sure to show how to start at “0” on any length measurement tool, which is not necessarily always at the beginning of the tool.
Show how to round up or down to the nearest whole number. Point out the half inch line on a ruler, and explain that if it comes before the half unit, you go with the number before. If it is at or past the half unit, it bumps up to the next number. Please note: Rounding is a very difficult concept for many 2nd graders. Many will not get it right away, and that is fine. Don’t expect them to master it immediately. It takes a lot of practice. Plus, the purpose of this lesson is to select appropriate measurement tools and begin experimenting with measuring.
Partner Work: Have students work in partners to go on a classroom scavenger hunt around the classroom. They should find objects around the room and determine the appropriate measurement tool and unit. Then they should try to measure each object.
While partners work on their scavenger hunt, rotate through each group to clear up misconceptions or to help them with using the measurement tools. Keep an eye out for any students who are really struggling and may need small-group or one-on-one instruction.
Closing: After the scavenger hunt, students come to the gathering area to go over their results. I tell students that, for today, it is OK if their measurements are slightly off. Students then share their results. If any group has major discrepancies, I model how to measure the object.
Before moving to the next standard, take an extra day for the students to practice measuring.
Opening: Start by giving a brief overview of customary and metric systems. Don’t expect students to memorize the different systems. The purpose is to expose them to the difference and the reason why they may see different units. Create an anchor chart showing the customary and metric systems and have students put it in their journals. It is also important to emphasize how students should typically use small units to measure small objects and larger units to measure longer or larger objects.
Work Time: As mentioned above, it is important to teach second graders how to round their measurements to the nearest unit. Real life objects are not going to always measure to an exact unit, so second graders need to understand how to round up or down. Use time today to have students practice measuring real-life objects around the classroom. Students can work in partners or independently. There is a page in my measurement packet that students can use to track their learning. While students work (either in partners or independently), I pull a small group of students who struggled with the lesson from the previous day.
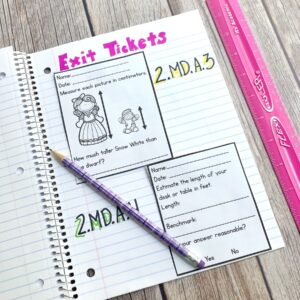
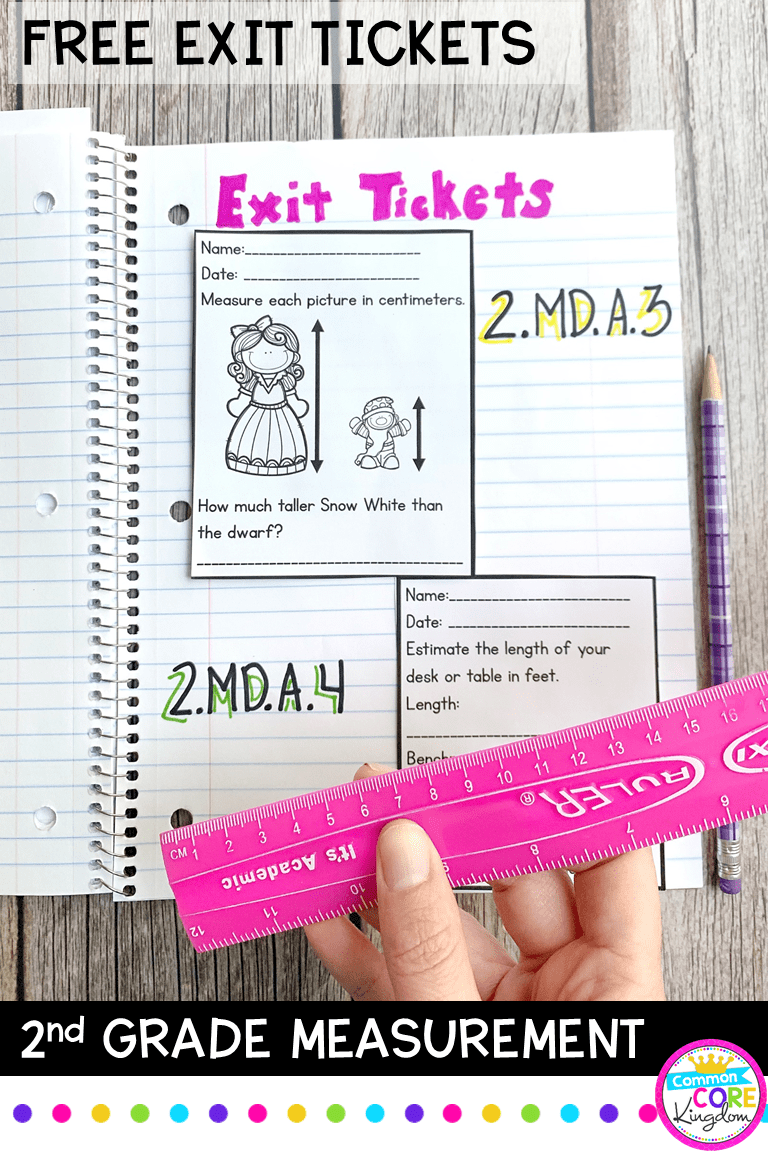
Closing: Review what students learned. This is a great time to give the next Measurement Exit Ticket.
Teaching Second Grade Measurement: 2.MD.A.2
Measure the length of an object twice, using length units of different lengths for the two measurements; describe how the two measurements relate to the size of the unit chosen.
Day 4 & Day 5:
In this standard, students should learn how different units compare to each other. For example, a centimeter is shorter than an inch, so if you measure an object with both units, you would use more centimeters than inches. It is very common for second graders to have the misconception that you would use more of a larger unit than a smaller unit. To correct this misconception, students need a lot of practice measuring objects using different units.
I model comparing measurements by using students as examples.
Model: Model measuring the same object with different units. I usually start with measuring a student’s height in both inches and feet, and then model with other classroom objects.
Group Work: Have partners or groups measure objects around the room using two different units.
Independent Work: Students complete practice sheets from the measurement pack to compare units.
Closing: Review what students learned. You can grade their independent work as an assessment to identify students who need extra help the following day.
2.MD.A.3
Measure and estimate lengths using units of inches, feet, centimeters, and meters.
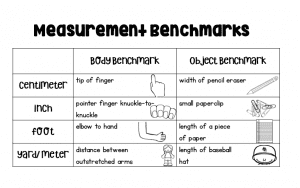
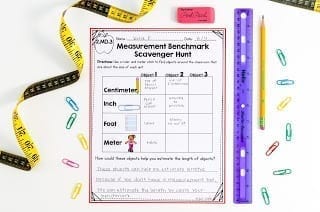
To estimate lengths, students need to have benchmarks to help them visualize the size of each unit. Students tend to easily understand body benchmarks for estimation. Body benchmarks are parts of your body that are approximately the size of each unit. The problem with this is everyone is a different size, so not all body benchmarks are accurate for everyone. You can also use common object benchmarks. Here is a list of examples for each:
Model: Introduce the term “estimation”. Explain that when we estimate something, we are not getting the exact answer, but a close guess. Tell students that to help us make measurement estimations, it is best to come up with a benchmark that will help us visualize the size of something. Model a few examples. For example, “the tip of my finger is about a centimeter, so I can use the tip of my finger to estimate how long my pencil is in centimeters if I didn’t have a ruler.” Measure the tip of your finger to set the benchmark, then use your finger to measure the pencil. Finally, measure the pencil with the ruler to compare your estimation with the actual measurement.
Work Time: Have students discover their own benchmarks by doing a Benchmark Scavenger Hunt. Students should start by creating benchmarks. Have them sit with a few measurement tools to become familiar with the length of their own fingertips, forearms, and feet. Then, they should find objects around the room and try to measure each object using the benchmarks.
While partners work on their scavenger hunt, rotate through each group to clear up misconceptions or to help them with using benchmarks and estimating. Keep an eye out for any students who are really struggling and may need small-group or one-on-one instruction.
Closing: After the scavenger hunt, students come to the gathering area to go over their results. Students share their results. If any group has major discrepancies, I model how to measure the object.
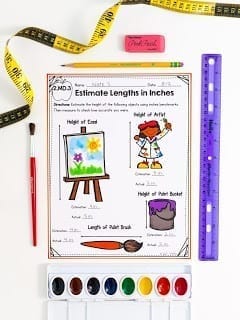
Students need tons of repetitive practice. Here is a sample estimation sheet from my measurement packet for students to do independent practice.
Teaching Second Grade Measurement: 2.MD.A.4
Measure to determine how much longer one object is than another, expressing the length difference in terms of a standard length unit.
In this standard, students are comparing the lengths of different objects. This standard pops up in different ways throughout many 2nd Grade math Common Core Standards (Comparing Word Problems (2.OA.A.1) Graphing (2.MD.D.10), and Money Word Problems (2.MD.C.8).
It is important that students have a deep understanding of what comparing means. Students should see the connections between these problems in all of these standards. Their method for solving these problems across standards will also be similar.
“Comparing” means finding the difference. To compare two lengths (or any other numbers) you can take the shorter length away from the longer length (subtraction a-b=c). You can also add up from the smallest length to the larger length (b+c=a). If students truly understand the concept of fact families, comparing lengths will make sense.
Day 8 & 9
Model: Model how to compare the lengths of two different objects. Explain that we are comparing their sizes to find how much longer one is than the other. Once again, use student’s heights as an example. This really engages the students because they love to model for the class. First, model how to find the difference between a tall and short student. Then, select two students to measure your height and another student’s height, then work together to find out how much taller you are compared to the student. Next, model how to find the difference between two smaller objects on paper that will have more precise measurements.
Group Work: Next, have students work in groups or partners to compare the length of two objects. You can use one of my measurement worksheets for this, but my favorite way to have students collaborate is by creating a poster comparing two objects. Create one poster for each group ahead of time, then students can measure and complete the task as a group. After, each group can share their findings with the class.
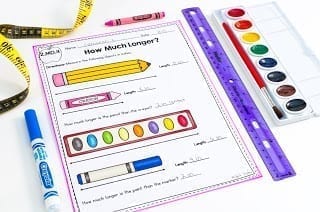
Independent Work: Finally, students practice comparing measurements independently. Worksheets from my measurement packet are available here. While most students work independently, pull small groups or individuals who need extra assistance.
Closing: At the end of each day, gather students to review what they learned. After you are confident most students have mastered this standard, you can give them the Measurement Exit Ticket for 2.MD.A.4.
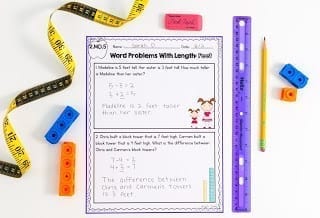
Teaching Second Grade Measurement: 2.MD.B.5
Use addition and subtraction within 100 to solve word problems involving lengths that are given in the same units.
Hopefully, before you introduce this standard students are already familiar with word problems (2.OA.A.1). It is important for students to understand that measurement word problems are no different than regular word problems.Students do not typically need to measure for a measurement word problem. When introducing this standard, it helps to carry from the previous standard and stick to word problems that compare measurement. Comparing measurement word problems tend to be one of the trickiest for students; however, students tend to relate to what they learned in the previous standard. After some practice, integrate all different types of measurement word problems.
 the appropriate measurement tools. (These can be found in my Measurement Unit here.)
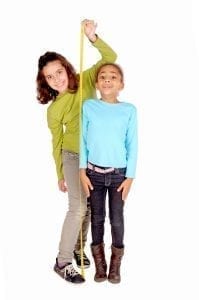
 Students do not typically need to measure for a measurement word problem. When introducing this standard, it helps to carry from the previous standard and stick to word problems that compare measurement. Comparing measurement word problems tend to be one of the trickiest for students; however, students tend to relate to what they learned in the previous standard. After some practice, integrate all different types of measurement word problems.